
Own your recordings: send AI voice recorder audio to your own server, no app or SDK work
The AI Recorder Card app for SNUGOGO CB08 can now upload every finished recording straight to an HTTPS address you choose. That means three things. You own the data: audio goes into your own server, with no vendor account. There is no app development: you don't build or modify an app or integrate an SDK, you only need one HTTPS receiving address. And you manage the recordings yourself: store them, file them by person or by card, and transcribe or analyse them with whichever AI tool you prefer.
The feature is in the Android app, version 1.1.18 and later. It is off by default, accepts HTTPS only, and keeps the access token in the phone's secure storage. It uploads recordings from the CB08 card and recordings made with the phone's own microphone. Get the app on the app download page.
Why this matters for B2B teams
- Data stays under your control. The phone POSTs each recording to your URL. The app does not pre-fill an address, and nothing is sent until someone enters an
https://URL and turns the feature on. - No vendor account. The setting reads "Used only on your upload server; no app account needed." The uploader name and email are optional and go only to your server.
- No app development. You don't fork an app or wire up the Bluetooth SDK. Your team only needs an HTTPS address that accepts a standard
multipart/form-dataPOST. - Card and phone recordings. Recordings from the SNUGOGO CB08 card and recordings made on the phone itself can both be uploaded.
- Your own AI pipeline. Each upload is a playable OGG file (Opus audio) plus a JSON description: device, start and end time, duration, size and SHA-256. You can feed it into your own speech-to-text, CRM, compliance archive or analytics with any AI tool you choose.
If you need deeper control, such as your own app UI or live audio, the open Bluetooth protocol and SDK are still available. For teams that only want the audio in their own system, this upload setting is enough.
How to set it up in the app (8 steps)
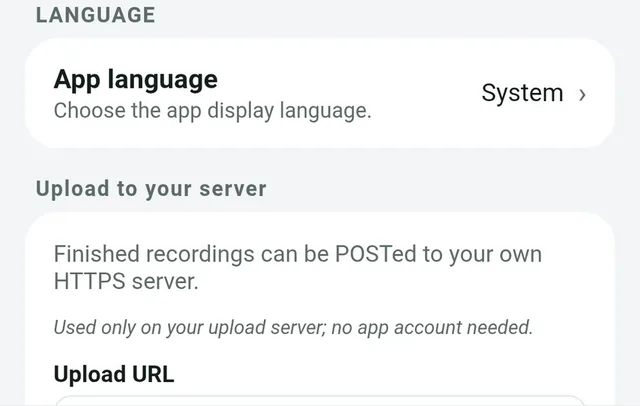
- Open the app and tap Settings at the bottom.
- Scroll down. Below App language you will see Upload to your server.
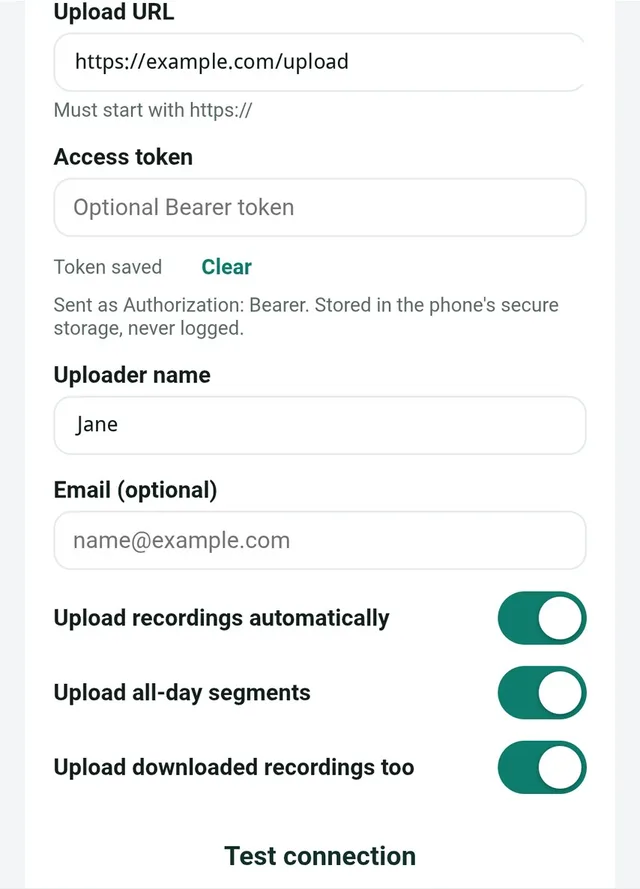
- In Upload URL, enter your server address. It must start with
https://, for examplehttps://example.com/upload. If you enterhttp://or an invalid address, the app shows "Only https:// URLs are allowed" or "Invalid HTTPS URL". - (Optional) If your server needs authentication, enter a token in Access token. It is sent as
Authorization: Bearer. Once saved, the field stays empty and shows Token saved. To replace the token, tap Clear first. The token is stored only in the phone's secure storage and is never logged. - (Optional) Fill in Uploader name (up to 64 characters, for example
Sales-03) and Email (optional). No sign-in is needed. - Turn on Upload recordings automatically. This is the master switch: nothing is uploaded while it is off.
- If needed, also turn on Upload all-day segments and Upload downloaded recordings too. The second one covers recordings downloaded from the card and other recordings that are not all-day segments. These switches can only be turned on when the master switch is on and the URL is valid.
- Tap Test connection. The app shows "Connection OK" or "Connection failed: …". The test only checks that your server can be reached. It does not upload a recording.
What users see in the recordings list
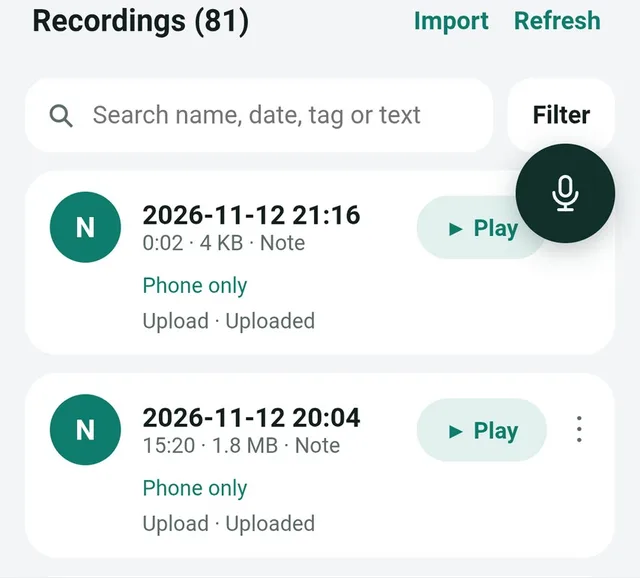
Each recording shows one of four statuses: Queued, Uploading, Uploaded or Upload failed. Tap Retry to try a failed upload again. If the phone is offline, items stay queued and continue on their own when the network returns. After a failure the app retries with exponential backoff, starting at about 1 second and going up to about 5 minutes. Uploads that haven't finished are kept when you close and reopen the app.
For developers: what your receiving endpoint must accept
Transport. The app sends a POST to the configured URL, HTTPS only. Terminate TLS in front of your receiver. The official app sends requests through the native HTTP stack, not a WebView, so you don't need Access-Control-Allow-* headers for it. CORS only matters if a browser page on another origin calls the same URL.
| Header | Required | Notes |
|---|---|---|
Authorization | No | Bearer <token> if the user saved a token. Do not log it. |
X-Device-Id | Yes | Automatic device identifier. May be empty if no card has been paired yet. |
X-Uploader-Name | Yes | URL-encoded uploader name. Empty if left blank. |
Content-Type | Yes | multipart/form-data with a client-generated boundary. |
Multipart parts
file(required): Opus audio in an OGG container,audio/ogg, filename{recId}.ogg. It plays as-is in a browser, ffplay, ffprobe or any Opus player.meta(required): JSON (application/json). Some clients name this partmetadata, so accept either name.
Metadata fields: deviceId, uploaderName, uploaderEmail, model (for example cb08, empty for phone-only recordings), recId, startAt and endAt (ISO-8601, true UTC), durationSec, format (ogg), bytes, sha256 (lowercase hex of the exact .ogg bytes; may be empty), appVersion and tags (optional string array).
{
  "deviceId": "CB08-1234",
  "uploaderName": "Sales-03",
  "uploaderEmail": "[email protected]",
  "model": "cb08",
  "recId": "note20261110-100000",
  "startAt": "2026-11-10T02:00:00.000Z",
  "endAt": "2026-11-10T03:00:00.000Z",
  "durationSec": 3600,
  "format": "ogg",
  "bytes": 480000,
  "sha256": "b94d27b9934d3e08a52e52d7da7dabfac484efe37a5380ee9088f7ace2efcde9",
  "appVersion": "1.1.16",
  "tags": []
}
The app converts the recording's local start time to true UTC for startAt. Don't assume it is the local time with a Z added.
Success and retries. Any HTTP 2xx is success. Any other status, a redirect or a network error is a failure, and the app keeps the item in a persistent queue and retries with backoff.
Test connection. The button sends a small JSON POST (not multipart) to the same URL. It carries the same Authorization, X-Device-Id and X-Uploader-Name headers plus X-Upload-Test: 1, and the body is {"test":true,"ts":1731283200000}. Return any 2xx and the app shows "Connection OK".
Storage tips
- Write files under
recordings/<uploaderName or deviceId>/. Using the device ID gives one folder per card; using the uploader name gives one folder per person. - Sanitize folder names so that
.., slashes and other path characters can't escape the recordings directory. - Keep the
.oggextension as sent. Never rename it to.opus. - If a
sha256is sent, check it against the saved bytes. Accept an empty value. On a mismatch, log it; you don't need to reject the file. - Before production, add authentication, size limits and durable storage, and keep the token out of your server logs.
Legacy note: app versions before 1.1.16 sent the card's raw Opus frames as {recId}.opus, with no OGG container. If you receive one, wrap it in OGG or ask the sender to re-upload from a current app.
FAQ
Do I need to build my own app or integrate the SDK to get recordings into my system?
No. There is no app development and no SDK integration. Enter your HTTPS upload URL in the app's Settings and turn on automatic upload. All you need is an HTTPS address that accepts a multipart POST. The SDK is still available if you want your own app.
Who has access to the recordings?
Recordings are sent from the phone to the server address you enter. The feature needs no vendor account or app login, and the optional name, email and token go only to your upload server.
Is the upload on by default?
No. All upload switches are off by default, and the app does not pre-fill an address. Nothing is sent until a user enters an https:// URL and turns on Upload recordings automatically.
Can recordings made on the phone itself be uploaded too?
Yes. Recordings made with the phone's own microphone can be uploaded as well as recordings from the SNUGOGO CB08 card. For phone-only recordings the model field in the metadata is empty.
What file format arrives on my server?
A playable OGG file with Opus audio (audio/ogg, {recId}.ogg), plus a JSON meta part with device, uploader, UTC start and end time, duration, size, SHA-256, app version and tags.
Can I transcribe or analyse the recordings with my own AI tools?
Yes. Once the files are on your server they are yours to manage. Send them to the speech-to-text, CRM, archive or analytics tool you choose.
What happens if the phone is offline or my server is down?
The item stays queued. The app retries with exponential backoff (about 1 second up to about 5 minutes), and the queue survives an app restart. Any 2xx response counts as success.
About this page
This page is published by PINGOOD TECHNOLOGY CO. LIMITED, a Hong Kong entity with engineering and manufacturing in Shenzhen. It describes the Upload to your server setting in the AI Recorder Card app for SNUGOGO CB08 (Android 1.1.18 and later). For hardware, SDK and integration options, see the developer page and the GitHub repository.
Related
- SNUGOGO CB08 developer page
- Get the AI Recorder Card app
- How to integrate a card-size AI voice recorder with your own app
Want to try the hardware behind these notes?
Six AI hardware platforms are in mass production. Tell us your market and channel and we send an evaluation sample.
Request a sample